|
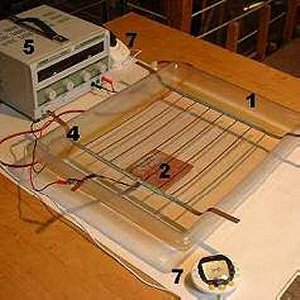
Procedure in using galv-etching equipment: calibrating the tray/tank; setting the time; differences in vertical tanks and doing open bite or plating. Extract from GREEN PRINTS by Cedric Green published by Ecotech Design, Sheffield, UK. - a handbook on new methods for non-toxic intaglio etching and metal plate printmaking, featuring the technique of Galv-Etch, a modern development of the 19th century electrolytic technique of Electro-Etching, and introducing Fractint and other alternative methods avoiding the use of solvents and chemicals harmful to health and to the environment.
using a standard tray and grid system Fill the tray with electrolyte to the height of the bottom of the grid and then remove the grid. Lower the plate to be etched into the electrolyte by its strip contacts. If you are using a backplate contact, put it into the tray with the strip bent up at the right position for the edge of the plate, then lower the plate into the solution onto the centre of the backplate contact. Place the grid onto the tray, with its wires just immersed in the electrolyte. At this stage make sure that the battery charger is switched off, either at the mains, or by a switch or timeswitch on its output Attach the positive (red) terminal of the battery charger to the plate contact strip or the backplate contact, and the negative (black) terminal to the grid or cathode. Check that you don't have any short circuits - leads, straps or crocodile clips touching. Then switch on for a moment, and watch the ammeter and voltmeter to check that the current and voltage are OK and note the readings. If the needle goes off the scale, or the digital display shows above 10 amps or 5 volts, switch off quickly, lower the voltage setting and try again. At this stage you may be calibrating your system with a test calibration plate, in which case follow the procedure detailed in the section on times and tests. If you are etching a prepared plate, calculate the time you need from the voltmeter readings (see section on times and tests). Then set the time switch, if you have one, leave it to etch for the required time. It is a good a idea to keep a record of what you have done on every plate. If the
ammeter reading is very high because the exposed area of your plate is
large, then the voltage should be lowered by switching it a lower setting,
or the resistance increased by switching in the control
box , or by the other means described later (galv-etching very large
plates). An uneven bite can be caused by the cathode grid or plate not
being parallel to the plate and opposite its centre. There is a slight
tendency for edges to bite more deeply than the centre, which can be counteracted
by having the cathode grid slightly smaller than the plate if you notice
a problem. Narrow open bite areas tend to bite more deeply than broad
ones, something that can only be avoided by biting in short steps and
stopping them out sooner. Similarly, isolated lines bite slightly more
deeply than closely spaced hatching.
open bite or galvanoplasty in a flat tray A flat tray can be
used for plating or open bite provided that you have some means of controlling
the surge of current caused by the very low resistance of a plate with
large areas of bare metal in the electrolyte. The control
box shown in the diagram can be inexpensively made up from off-the-shelf
components. Note that adding a resistance like this in series, has the
effect of reducing the voltage over the anode and cathode (see section
on times and tests). For plating, a grid (which
becomes the anode) is not ideal as it is etched away and a solid plate
can be attached to the underside of the grid. etching a plate in a vertical tank A large tank requires a larger volume of electrolyte, but its greater width allows you to see the progress of the etch more easily and you can have more control over the distance between the plate and the cathode grid or plate. The cathode should be about the same area as the plate, and it should be hung directly opposite its centre. The tendency for lines or areas near the edges of a plate to be etched more deeply than the centre can be counteracted by making the cathode plate slightly smaller and therefore closer to the centre of the plate to be etched. When plating or deep
etching large areas of open bite with a strong current (amperage) there
is often some loose deposit produced, and the advantage of a vertical
tank is that it does not drop back onto the plate, but sinks to the bottom
of the tank. This can then be emptied and filtered and the clean solution
returned to the refilled tank. If you don't have a tank with a tap, use
a plastic tube as a siphon, and start the siphon going by holding it all
under the electrolyte surface (with gloved hands) until it is filled with
liquid. Then close both ends and take one end out and put it into the
receptacle to store the electrolyte. Don't start the siphon by sucking
the liquid up it For storage I use plastic camping water storage jerry-cans,
with taps.
Large exposed areas
of a plate will increase the current required from the power supply, so
to keep the current within the limits of the power supply's ammeter, the
resistance can be controlled by lowering the voltage output of the power
supply with the controls that you have. This will increase the time taken
to etch, but will decrease the intensity of the etch per unit area. There
is not usually any need to protect the whole of the backs of plates because
very little electrolytic action will take place "round the corner" as
it were. The ions in the solution are most strongly attracted to the nearest
surfaces, which are the facing sides of the anode and cathode plates.
This also makes it easier to make an electrical contact with the back
of the plate, avoiding the need for crocodile clips and possible marks
on the surface.
|